Thursday, December 03, 2009

WoodWorking Artist Views

Saturday, March 17, 2007

Band Saw Performance Tips

Intarsia woodworking Style Liquor Cabinet by J. Mifflin
by Dwayne Goerges

As with all shop tools there are procedures that if followed will extend the life of both your band saw and the cutting blade. Proper tension, feed pressure, regular cleaning, and lubrication are all required to get the most from this tool.There are certain precautions to be taken in order to protect the blades from premature wearing. For example, when the blades are new, they are too sharp, and any rigorous action on it will cause damage to its teeth. In order to avoid premature wear, manufacturers suggest a break-in action for new saw blades. This can be done by reducing the speed of sawing in the initial period, often to half of the normal speed. Reducing the feed quantity in the beginning, say for the first 50 square inches of the material, will also help to wear off the extra sharpness of the blade and will make it more durable.Even if you don't know what the normal feed pressure for the material should be, to be safe, start with a light feed, and slowly increase the feed pressure until proper curly chips (in metal) or chip sizes (for wood) are formed. Be aware that there are certain alloys such as ones that are nickel-based which are sawed under lower speeds and so need more break-in pressure.Lubrication is a must for band saw blades cutting metal. Never use water as a lubricant or a cleaning agent as it will cause rusting and block the smooth functioning of the blades. A suitable lubricant will be a mix of one measure of High Adhesion Chain Saw Bar oil with half measure of kerosene or diesel. Apply the mix on both sides of the blade.De-tension of the blade is necessary once the sawing is completed and the blades are put to rest. Due to the heat produced during the cutting process, the blade stretches a little, and upon cooling they shrink. Therefore, if the blade is left on the saw with tension, the shrinking will have a negative effect on the blades, sometimes causing a crack in them. Also, this unnecessary tension will de-shape the head of the saw and put pressure on the shafts and the bearings.The gullet is an important part of the band saw, and while sharpening the saw blade (normally this is done with the help of a stone) you need to take care of the gullet by allowing the stone to move around the bottom of the gullet along with the front and back side of the blades teeth.Always try to maintain a ratio of no more than 65-70% saw dust and 30-35% of air in the space between the saw blade and the material you are sawing. If you do not maintain this level, you will be blocking the air which otherwise will push the dust out, and the result will be the extra heat generated which will make the saw dust warm and ruin the life of the band saw.Last but not the least, regular cleaning should be done in order to maintain your band saw in proper condition. The excessive deposit of the waste materials will reduce the lifespan of the saw.It is also recommended that you choose a high quality blade. Low quality band saw blades are made with inferior tool steel that will dull quickly, as well as have a much higher risk of the blades breaking due a poor weld.

Read more!

Saturday, March 10, 2007

Building Cabinets

Intarsia Woodworking Running horses Hope Chest by J. Mifflin

Written by Bowe Packer
For the beginning woodworker building cabinets is one of the easiest and most satisfying things to do. This of course is After a little time has passed and you've gotten a little experience under your belt! Building cabinets truly is a fairly simple thing to do, but it's not necessarily for the novice woodworker. Now don't get me wrong here, it can be done, just not suggested without a little more know how and experience. With such things as joints and right angled corners required you might want to start with something else. This will not only build your experience but your confidence as well.


Then again if you're adventurous and don't really mean to use the cabinets you build anyplace in a prominent place you should be alright. The first thing to do in this case is to get a plan or a design of the cabinet type you want. This may seem fairly straight forward, however for many it could be the hardest part. For your first approach at building cabinets you might want to think about starting off with something fairly simple. A project that can be accomplished in a relatively short period of time.
Perhaps even look at building cabinets without doors on them, which fundamentally translates to shelving if you think about it. On the other hand, building cabinets with the doors on them can help you increase experience and again increase your confidence. Remember, it is about taking the risk and making the mistakes. Now in the long run this experience will prepare you for further explorations into the world of cabinetry.
Since you've now started off with a appropriate design or plan, the next thing you want to do is to move on to the next phase of collecting your materials. These will include not only your Lumber but also your tools, your nails, joint fixings and any other tool or material you might need to complete the project. Don't worry, you will many times forget something, especially in the beginning.
After that if you don't already have one, you'll need to clear out a desirable space for you to work in. This space needs to come with a good deal of lighting and where you won't mind the sawdust collecting. You'll also want to make sure that it's off the beaten path as you won't want to clearing out your things, always to make room for everything else. Also, this space needs to be one that doesn't mind sawdust, clutter, designs and anything else that goes along with woodworking projects.
At the very least you'll want to keep your workspace cluttered for a few days or until you finish building cabinets and whatever else it you're going to be doing. This is so you will know where everything is that corresponds to that project. After that the next step you'll have to take is in the sawing, measuring and the marking, although not necessarily in that order. This is the fun part, becuase now your project is starting to become real.
After you have everything marked off and sawn to the correct lengths the next thing you'll want to do is to start assembling your cabinets. That involves gluing in some cases, driving in nails and screws and other such things. The assembling process is one of intricacy, so make sure your mind is prepared.
The last thing on your list for building cabinets involves coating the piece off. Now this phase of the project can be some what relaxing. At least in the sense that the cabinets are now assembled and are just waiting to get beautified. This is normally completed by applying a clear coat or a wood varnish or even painting it to the color you want. After that you're good to go and if you've taken your time with this cabinet and done a genuinely good job, it might look like you've been building cabinets for some time!
Bowe is the webmaster, content provide and author of the ebook: Woodworking Essentials. Please visit his site at: www.woodworkingessentials.net

Read more!

Monday, December 25, 2006

Job Costing for Woodworking

Restroom designed and built by J. Mifflin


Job Costing Software Proves That Time Really Is Money by MARK STEARNS

At a loss for how to increase profitability in his seven worker shop, Mark Stearns, Owner of Alaskan Wood Moulding in Anchorage, paid a sizable sum to a business consultant "basically to insult me - to tell me everything I was doing wrong in my business." The advice came down to this: Stearns needed a better grasp on his employee's productivity.

His knew the material and equipment costs of making customized moulding, but could only guess at how efficient his workers were. The problem was that he could not be certain which jobs were money-makers, which were losers, when he wasn’t sure about labor costs.


Immediately after implementing a computerized job time-tracking system, Stearns noticed that employees weren’t standing around for 10 minutes at the end of each day guessing on their time sheets. When he saw his profits increase after using the system for more accurate job-costing, he knew he had found the solution. Tracking labor time on jobs has helped Stearns decide which jobs to seek out and which ones he should turn down. “We’ve found that if it is a smaller job, we have to be much more cautious because we can lose money a lot quicker,” he said.
Job time-tracking software has been developed specifically for shops by companies like TaskKlock, Trakware and Data-Maxx. Some utilize user friendly technology as simple to use as an ATM, where workers touch a screen and the program records their hours by task, from how long workers spend sanding or running the band saw, to doing non-productive tasks like cleaning the shop or taking a lunch break. Such systems immediately compile worker task time for management to see how long it took to complete one job or task versus any other. Worker, or machine productivity may also calculated and reported for management to evaluate which processes, employees or machines complete the task or job most efficiently - generating the most profit.
When it comes to increasing productivity and profitability, no shop is too small for job and labor tracking. Time-tracking software is available on the market for shops as small as one person. Barrie Nadin owner, operator and usually sole shop worker of Phoenix Installations in Orlando, Florida benefits from a system based on an in shop touch screen. “There’s only me here so I’m often interrupted in my work. Because the touch screen is so easy to use, I can switch from one task to another quickly and keep it all recorded.”
For owners of most such small shops, the added burden of task tracking and job time costing often seems too prohibitive of an administrative indulgence. That’s exactly who needs an automated task time tracking system the most: the business owner doubling as the shop worker who simply doesn’t have the time to track job time. As Nadin explains, “I’m not a record keeper, so without an automated system I would have no way to realize where I don’t make money. Now I can see where I’m not making profit and so I’m able to address the problems. I can see my own inefficiencies and focus more on the tasks that I can actually bill for.”
To determine exactly where that line is between the cost of completing a job and turning a profit, Greg Diez of Millworx, a custom cabinet shop in Pacoima, California relies on a time-tracking system to precisely monitor the elusive costs of doing business. “We job cost every thing we do whether it’s $500 or $5,000. Job costing to me is what drives this business. I get down to the very smallest component of my business and make sure that what I’m bidding is making money for me.”
“Once workers clock in on the system they already have to know what job they’re working on,” said Tom Corkery, owner of European Techniques, a cabinetmaking shop in Prescott, Arizona. “Before, they would punch in and then kind of walk around and look for something to do. Now they have to know what they’re going to do before I can pay them for their work. It’s helped increase the amount of awareness on the job.”
And it's not just the shop workers who are made more aware and productive. Most importantly, using a software system to track task and labor time has made Corkery himself more precise with his actual job costs. “Most cabinet jobs are pretty much guesswork,” he said. “But this will tell us whether we are making money on a job.” This precision translates into more accurate bidding which creates efficiency on the job right up front.
Chief Estimator at Pegasi Unlimited in Phoenix, Arizona, Debbie Hernandez tracks time on jobs to give her accurate data for bidding a job. "Everything we do is custom. Estimators joke that it's like throwing a dart at a bulls-eye. The more accurate the data I can have, the better my aim."
In Diez's opinion, “It doesn’t matter what size a business is, if monitoring labor is cumbersome we must ask ourselves what we’re not doing instead to be making money with that time. For a smaller shop, because we juggle so many duties, it’s even more important to be using our time more effectively and incorporating as much automation as we can.”
The author, Mark Stearns, is the founder of Alaskan Wood Moulding, a custom woodworking company in Anchorage since 1989. Mark and Walter Erskine also developed a timekeeping and job costing software, TaskKlock, for AWM. They created a separate company and have been selling TaskKlock in North America since 2001.
save time and money with TASKKLOCK.COM

Read more!

Brad-Point Tool Bits

Intarsia Wood Working by Artist J. Mifflin

by Leon Groom
Most individuals have made the mistake at one time or another to ignore sound advice from experts and reach for the standard twist bit, instead of the brad-point bit. The blunt, low-angle point of a twist bit makes for a difficult time to locate the hole with precision and accuracy. Conversely, the bradpoint bit makes it quite simple to place the bit with accuracy on layout lines.


Normally, the profile of bit tips fall into one of three categories: w-shaped, spade-shaped or spur-shaped. The spade shaped Harbor Freight as well as the Fisch Precision bits drill via a combination of scraping and cutting. This generates more fine dust than the other tip shapes. The Fisch Precision bit bored straight through the whole 2 inch thickness of a white-oak board as it produced a clean exit hole in the test. Unfortunately, the entry hole it produced was extremely ragged.
Even in plywood, chip-free exit holes may be vital to you. The Fisch Vortex D is generally a good choice. However, the Wolfcraft bit is approximately 1/3 the price and it bored a hole nearly as clean. Although the entrance holes for the two bits were somewhat ragged, chip clearing was excellent for the two of them. However, the Wolfcraft bit had penetrated about 5/8 inches into the white oak prior to the drill being bogged down.
Lee Valley high-speed spur-shaped bits and the Forest City brand set cut clean, holes of precision in plywood and maple. Chip clearing was no problem at all as they also drilled to a decent depth in white oak, with flat-bottomed holes left. The Lee Valley brad-point bits had easy penetration and produced a practically chip-free exit in the hard maple. The carbide tipped bits, from Highland Hardware, have a somewhat different design than the other bits. The design offers outstanding chip removal, but is not suitable for a doweling jig that needs a uniform diameter.
Lee Valley Tools, a Canadian retail and mail-order family-operated company, specializes in woodworking equipment and tools, along with woodworking gifts and hardware. They have patented and developed via Veritas Tools many inventive accessories and tools which include router tables, sharpening systems, marking gauges, hand planes, measuring tools and various gadgets.
The Lee Valley bits were the most impressive overall, with the best value at $42 as set, with flawless holes and clean-cutting action. For more details, visit an online retailer that provides Lee Valley Tools and Veritas.
About the Author
Leon Groom writes about PowerTools coupons, Hand Tools and Cordless tools

Read more!

Sunday, May 21, 2006

Turn Your Hobby Into A Business

Parsons Table
by Karen Barnes, IAHBE Staff Writer,
Each year many people earn a living from their hobbies. Hobbies are one of the most under-used income opportunities around. Many people have realized that the skill and imagination they have developed through their hobbies are invaluable to those who appreciate and seek them out. Hobbies range from woodworking to crocheting to fishing to writing. Your hobby is not only relaxing to you but it also can be a source of income when you sell it to other people who are unable to make or find it themselves. With time constraints for many people these days--and the inability to find the time and energy to make these projects or learn these skills themselves--many will pay for such items and services from individuals who have the skill and know-how to produce what others are wanting.

A classic example of a hobby that earns individuals a nice income each year is woodworking. Woodworking projects can range from something as simple as planter boxes to items that are as complicated as furniture pieces. I have known individuals throughout my lifetime that have made a part-time income from building small wooden lawn ornaments and lawn furniture. With their part-time income from their hobby, they have taken trips and cruises that they would normally have been unable to do with their regular paychecks from their jobs. I have known other hobbyists who have not only done the same as the woodworker I mentioned but also have been asked to work on consignment for their pieces. I know of a few ladies who crochet doilies for their pastime who have been asked to crochet doilies and tablecloths for other crafters for their display tables and cases with payment for their services. Bead work is another craft that can be very lucrative. Many beaders find it more lucrative to have their crafts displayed for sale in consignment shops that will take care of the selling part of the hobby. While selling your hobby pieces to those who visit arts and craft shows in your area, consignment shops, and to other crafters are common and popular ways to market your crafts, creating a network of friends and family who have your projects around their homes is also a great way to gain more customers for you. With this type of word-of-mouth advertising, your income earnings could be surprising. If you haven't yet ventured into the sales world with your hobby, you probably have many questions about what you need to know to make this happen. Let's get into this a little bit deeper with some typical, yet simple, questions and answers: 1. Where would you find places to sell your crafts? Arts and Craft Shows--Many communities have Arts and Crafts shows in all seasons by setting up Arts and Craft Fairs at community buildings, such as armories, 4-H buildings, county fair grounds, and any other civic buildings. Check with any local city office for days and times that they are having these shows. The city clerk's office usually will have a list of these events because the sponsors of these shows will have to go there to get permits for holding their events. Check with the sponsors for any fees they may charge, such as booth rent, sign-up fees, deposits, etc. These charges may be tax deductible. Consignment Shops can be found in any of your local telephone books or newspapers. Call or go by these shops and talk to the owners about using their shops to sell your items for you. You will also need to ask the owner how much they charge you for selling your crafts, renting a booth, etc. These charges can be tax deductible. 2. When is the best time of year to sell your crafts? Arts and Crafts shows are mainly held in two seasons. The first season is in the spring when the general public is looking for new home decorating and lawn and garden ideas to revitalize their homes. They may even be looking for summer holidays decorations. The second season is in the fall. In the fall, many are looking for Halloween, Thanksgiving, and Christmas decorations for their homes. Arts and crafts will also be bought for gifts for family, friends, and co-workers. 3. Where can I find materials? There are many places that cater to hobbyists where you can find and purchase your materials. Hobby Lobby, for example, carries a wide variety of materials for every hobby under the sun. Michael's is another large chain with arts and crafts supplies. Think about what craft you are making and search your phone books, newspapers, and the Internet for stores that cater to your specific hobby. 4. When does my hobby qualify as a business and not just a hobby? When you can show that you are making a genuine and professional effort to earn money from your hobby, you can support the claim that it is a business and not just a hobby. To do this, you must keep meticulous records of both your expenditures and your earnings, and you should do everything possible to keep your business monies separate from your personal monies. Supporting evidence that would help the Internal Revenue Service believe that you are really trying to run a business would include business cards, copies of ads or flyers that you have used to promote your business, mileage records and descriptions of the business-related events you have attended, and of course, invoices and customer information for those to whom you have made sales. IMPORTANT: You do not necessarily have to make a profit from your business, but you have to show that you are TRYING to make a profit! Don't let Uncle Sam scare you away from your dream job. When it comes to filing your taxes each year with the IRS, any accountant can help you with the records you need to keep for your tax purposes. As scary as this may sound, this can be the easiest part of turning your hobby into your dream job. There are publications, articles, forms, and much more that can aid you in dealing with your taxes. We have included some excellent links in the "Sources" section below. With the continuation of an unstable economy and loss of jobs, using your hobby as an extra income can help you in many other ways. Use your earnings for your retirement account or to help pay for college tuition...the possibilities are endless! SOURCES Anthony, Joseph. "Your Hobby Should Be A Business: Here's Why." Money Matters BCentral.com. http://www.bcentral.com/articles/anthony/225.asp Godwin, MCC, Leslie. "Should I Turn My Hobby Into A Career?" BusinessKnowHow.com. http://www.businessknowhow.com/homeoffice/hobbycareer.htm IRS Publication 535: "Deducting Business Expenses." http://www.irs.gov/publications/p535/ch01.html IRS Article: "Is It A Business Or A Hobby?" http://www.irs.gov/businesses/small/article/0,,id=99239,00.html SBInfoCanada, About.com. "I Make A Few Bucks From My Hobby. Do I Have To Declare This Income?" http://sbinfocanada.about.com/cs/taxinfo/f/hobbybiz.htm Stern, Linda. "Turning Your Hobby Into A Business." Boston.com http://www.boston.com/business/personalfinance/ articles/2003/09/24/turning_a_hobby_into_a_business/ ~~~~~~~~~~~~~~~~~~~~~~~~~~~~~~~~~~~~~~~~~~~ © Karen Barnes, March, 2004. All rights reserved worldwide. IAHBE Writer ( http://www.moreinfo247.com/93983.939/IAHBE )and SFI Affiliate ( http://www.moreinfo247.com/93983.3101/free ). For more articles like this go to http://articles.1sta.com

Read more!

Sunday, May 07, 2006

Buy a Cordless Drill

octagon dining table
by James Brown
If you have never had the luxury of using a cordless drill you may want to look into purchasing one for your next project. Cordless drills come in a number of different makes, models, and sizes. Each one has their own set of features that offer both advantages and disadvantages to the user.

The number one overall cordless drill is the 15.6 volt Panasonic EY6432GQKW. This drill out performs the competition in almost every area. Its main selling features are the power that it offers, and the lightweight package that it comes in. It weighs in at only 4.8 pounds, but outperforms both 14.4 and 18 volt cordless drills. The EY6432GQKW is also at the top of the class when it comes to battery life. You can put in a lot of work with this drill without ever having to recharge it. This is a very convenient feature for those long projects. As far as cost is concerned, the Panasonic EY6432GQKW will set you back approximately $200.
If you are on a budget, and feel that you cannot afford a cordless drill, you may want to reconsider your thinking. Even though budget drills are not as powerful as the top of the line models and lack the features, they are still very capable performers. At the top of the budget cordless drill class is the 14.4 volt Ryobi SA14402KF. For approximately $80 you get your money’s worth. Even though it will take two hands to get maximum performance, this drill provides decent power. This drill comes with a two year warranty to ensure that you will be set for at least the next couple of years.
When you are searching for a cordless drill there are many places that you can look. Most people start out at their local hardware store where they will have a lot of selections available. This will allow you to test out a lot of different models to ensure that you get what you need.
If your main concern is price, you will want to go online to shop for the best deal. There are hundreds of online stores that sell cordless drills. By comparison shopping you will be able to find the drill that you want, at a price you can afford.
A cordless drill is a great addition to any tool collection. Start your search today by checking out the two recommended models listed above.
About Author:JAmes Brown writes about Hardware Tools and hardware coupons http://www.hardwaretoolsonsale.com
Article Source: http://www.bharatbhasha.com/

Read more!

You Must be an Artist

Intarsia Wood Working Abstract Design

by Colette Kelso

“...Meet this solemn question with a strong, simple ‘I must,’ then build your life in accordance with this necessity; your whole life, even into its humblest and most indifferent hour, must become a sign and witness to this impulse.” - Rilke
We are, all of us, meant to create. We are creat-ures, thus it is evident in the world around us that as a spider spins a web, a bird builds a nest, humans are possessed of a spiritual and biological mandate to spin and build a world of beauty and function. The human distinction is the ability to make symbols. Symbolism is the art of investing the world around us with meaning by expressing the invisible or intangible through visible or sensuous representation. This is the simplest, the least unsettling definition of art and creativity. From this definition, we have come to believe and to thoroughly accept without question that art belongs to those who paint the paintings, write the words, and mold the clay, into those representations of the intangible and the invisible. Art has therefore been divided into those who do and those who don’t.


The reinstatement of art into every one of our lives, both in our ability to receive and to recreate it, is to return to living with meaning. Creativity is, like evolution, like all growth and change, an irrepressible force in nature. Thus far, only humans have attempted to turn away from this call, and a case can be made that it is this turning away that is the cause of so much of our pain, suffering, and longing. This suffering, however, is the result of confusion and misdirection, not hapless circumstance.
Art, like science, philosophy, and civility, is our best defense against the insupportable weight of all that we don’t know. If we could disperse the weight among us citizen artists, come up with a more inclusive outlook, we could lighten the formidable load of ignorance. In the broadest sense, art is a response in whatever form it takes--an expression of the love and beauty and terror as it is given to us through the visible bounty of Nature—that pulls us further out of the mire. Creativity is anything that fosters that indwelling spirit, any creation or activity that advances the progression of the unimpedable energy of growth that is life. The replication of that love and beauty, the balm that soothes the terror, or the release provided by the recognition of that terror, is our task, is the way of art and creativity, a whole-some response to existence.
Whether you are a fireman, a pathologist, a babysitter, or a banker, you must be an artist. Must be means, first of all, the recognition of this as your identity, as in, “Oh, you must be an artist...” Secondly, must be makes it imperative. You must respond to the dignity evolving out of creaturehood toward a greater man, toward God, and remain fearless as well as awe-struck by the vast implications. In the meeting of this challenge, you will be recognized by a light in the eye of those you encounter, as extraordinary.
The commitment to creativity, like any other commitment, will become an integral, necessary, part of our life once we realize that not only does our art spring from and define the core of, yes, our own identities, but more importantly, that it is an expression of that which is greater than ourselves. Thus who we are becomes linked with the world, and it is given meaning and purpose by what we do with this link. Creativity is the purveyor of meaning.
We begin with a sense that there is something within us that must act and express. We begin by going beyond the sadness we have experienced at having this something repressed, discouraged, buried. We begin with the thin person with the fat body, the sober, healthy being underneath the addict’s skin, the lover inside our neglected hearts. We begin with the hope and the longing of the creative force within ourselves.
About Author:Colette Kelso's book, Who's a Loser? ultimately emphasizes bringing creativity into your life. It can be viewed at http://www.whosaloser.blogspot.com. And if you're in the job market, view her job blog at http://www.ineedajobyouneedajob.blogspot.com. Her profile can be found at http://www.blogger.com/profile/18338185.
Article Source: http://www.bharatbhasha.com/

Read more!

Sunday, April 23, 2006

Abstract Intarsia Art

Woodworking - Creative, Relaxing and Timeless
By
Kent Walters
The title reflects Woodworking as a hobby, not as a vocation. Vocational woodworking is pretty much the opposite of the adjectives in the title because of the intense pressure to produce quickly in order to make it pay the bills. So we'll stick with the hobby orientation for purposes of this article.
Many people start a project with very little thought. This is okay if you are working from plans, material lists and cutting lists in a woodworking magazine, but when you strike out on your own, this lack of planning often results in a project that becomes very difficult to manage somewhere in the middle, when more wood needs to be added, or, more often, the final piece has to shrink just a little to make do. The project gets less fun as measurement adjustments keep being made to the original plan to keep the modified parts fitting with each other. It’s kind of like playing chess with a saw, anticipating three moves ahead what the measurements are going to have to be because of the one deviation you made three steps ago.

What I would like to accomplish here is to lay out a sequence of events that need to take place as you migrate from the canned projects in the woodworking books and magazines to your own project planning.
Recreational woodworking starts with an idea of something functional (a shelf, a table, a bench, a box, a desk) or something meaningful (a toy, a piece of art, a frame), or a combination of the two. This idea can be born of inspiration from looking through woodworking magazines, seeing something in a model home, or a need that exists in your own home.
Most often the concept is sketched out. Traditionally, this is done on the back of an envelope or a partially used napkin, so be sure to have some of those lying around. Once you have the sketch, you have to decide how big you want this thing to be. Often, this is determined by available space or intended function. Staying true to our adage, “measure twice, cut once”, a rough dimensioned drawing is created. If this is to be a functional piece (desk, cabinet, etc.), be sure to stay reasonably close to standard measurements for desk heights, knee-hole allowances, kick spaces, cabinet heights, rail and stile widths, file drawer dimensions, etc. You’ll be glad you did.
By now, the concept has evolved enough that the desired finish (paint, stain, varnish, oil) has been narrowed down, and a type of wood has been selected that is appropriate for the project, budget and finish. With so many choices of wood and finish conveniently available today, this can be quite an exercise.
Now that the type of wood and finish have been determined, it is time to decide what kinds of joints you are going to make (assuming you are not making a boomerang or hollowed-out canoe or some other one-piece thing). Considerations are strength, the look you are trying to achieve, your equipment and capabilities, and the amount of time you can invest. This can be one of the more strenuous mental exercises because of the range of choices. The look of a bung or button, the clean lines of hidden biscuit or dowel joints, the strength and intricacy of the dovetail, the simplicity of nails and glue. All have their place, and you have to decide.
Along with the joints, hardware has to be planned. Based on the hardware, you have to adjust your dimensioned drawing to accommodate clearances for drawer rails, those extra half inches for lap and dado joints, hidden hinge overlaps, insert depths for frame-and-panel door panels, etc. You also have to consider depth of relieves and radii of router profiles to make sure your stock is thick enough to allow your concept to mature as planned.
A final dimensioned drawing is created, allowing for all joint and hardware considerations, and a cutting list is prepared from this drawing. Note: This drawing does not have to be to scale, or look professional in any way. It helps the visualization process if it is proportional, but the real important aspect of this drawing is documenting the measurements. Don't be concerned about the appearance of the drawing - that is not what you will be displaying.
Now, finally, we can go to our lumber supplier and select the actual wood we will be working with. This is not where you want to save time. For the parts of the project that will show, especially for projects where the natural wood is intended to be a design feature, extra care should be taken to select the grains and natural attributes that will best fit your concept. If you are saving money intending to plane “three-sides-good” lumber, make sure the width runs far enough on the pieces selected with enough margin to get the length needed for each piece AFTER PLANING. Measure the finished surface to the beginning of the raw edge. For framework, cleats and carcasses look for straight, unknotted pieces. Warps and twists can be overcome, but they make the whole project less fun.
With this level of preparation and with sharp tools, the project will proceed nicely and the finished piece will bring you satisfaction, many years of service, and can sometimes even become a treasured family heirloom. Note: The heirloom status is often true of a desk, a well-made toy or a rocking chair. Don’t set your expectations too high for laundry shelves.
Kent Walters is currently an amateur woodworker in Houston, Texas. His entrance to the craft was similar to many - woodshop in school. He continued the craft some time later as a toymaker on a drill press, sander and spray booth. He was a furniture maker at one time, building mostly desks, book cases, wall units, display cases and cabinets.
As time moves on, he is “downsizing” to intarsia and toys – panels are getting too heavy to lift, and heirlooms are becoming more important than they once were. For more articles, resources and a woodworker’s website directory, see http://www.woodworkingcenter.com/

Read more!

Friday, March 10, 2006

The Ark

The Ark is a cedar lined hopechest built from red oak plywood. This is a clean, simple design which which makes this hopechest easy to build. The top has spring loaded hinges to let the top down slowly so fingers don't get smashed. The hinges also have a locking position to hold the top open more than whats shown here.

The ARK is a hopechest with a overlay intrasia design


The intarsia design is not mine, it's from Judy Gale Roberts who is very well known in the intarsia world ( intarsia.com ). As a designer I had to swallow my pride when asked to use someone's design other than mine. It's part of doing business I guess, of course I did make some changes to the style.

Read more!

Online Benefits for Craft Businesses

By: Narelle Davison


The internet has an endless number of benefits for craftspeople, not just as a medium for selling the end product but for each step that leads to sales. The fact that you are reading this shows that you already utilise the web for information but perhaps you have not yet considered some of the following points presented.
The ideas provided in this article have come from interviews with craftspeople, conducted for AussieCrafts.com, in the interest of sharing information with our peers. When boiled down to its bare essentials this is the true essence of the internet but it sometimes gets lost in all of the advertising and sales. The interviews spawned a host of ways in which the internet assists the crafters, both in their business and creatively, and provided much insight into untangling the web.
Inspiration:

When asked about the sources they use for inspiration most craftspeople have said that the internet is a much used research tool. This is particularly useful with commission pieces, where a client gives a basic idea and there is a need to familiarise yourself with the subject. Browsing websites is also great for when you want to start a new piece but are not quite sure where to begin. No matter what craft you do if you are stuck for ideas on what to create there are always plenty of places to get some quick inspiration online. The obvious way to get ideas is to search for your craft in the search engines but some other methods are:
Type your craft name into Google image search
Yahoo groups on your craft often have galleries
Online stores that sell your craft
Craft directories
Historical sites related to your craft, most crafts did after all come from very ancient beginnings.
Try searching for crafts that are similar to yours, if you do pottery, for example, search for glasswork. The colours and shapes are likely to spark new ideas.
If it’s a more abstract inspiration that you need such as colour or texture then art, photography and nature sites are fantastic sources of ideas. Stock photography sites (such as www.dreamstime.com), for example, have thousands of images of almost everything imaginable. Let’s say you want to create a bead necklace that reflects the colour and movement of the ocean. If you browse the sea and ocean category of a stock photography site you can jot down ideas based on what you see as you view page after page of photographs that cover every aspect of the ocean.
Education: patterns and tutorials
There are very few crafters who believe they know everything there is about their craft. Who of us do not want to learn something new? The internet is the best source of tips, tricks, patterns and tutorials on every craft imaginable, so much so that many craftspeople no longer purchase books about their craft. Many sites offer this information for free, as a way to attract and keep surfers, much the same way as articles like this are utilised. Others charge a subscription or a cost per tutorial, often downloaded as an e-book or a pdf file. For many crafts there are also online classes or lessons via email, again some are free (and often include advertising) and others are subscription based.
To find these valuable resources consider using some of the following terms alongside your craft name: tutorial, pattern, learn to, ebook, lesson, techniques, instructions or projects. These keywords were tested using Google search and beading, for example ‘beading projects’, and the results were astonishing. If it a particular technique you are searching for then add that to your search query, for example ‘beading peyote technique’, where peyote is a type of beading stitch.
Purchasing tools and materialsThe internet has brought about a convenient way to buy almost anything, from anywhere in the world, and to craftspeople this has been one the most important benefits of being online. Often there are supplies needed for craftwork that are not available locally and this can be the case no matter where you live. It may be because it is only manufactured in a small area of Europe or that there are few people working in the same craft as you and therefore there is little demand.
Apart from availability issues nothing is better than being able to browse many stores in a short space of time and not only get prices but also see things without having to leave home. Ebay is popular with many craftspeople due to the range of goods and their prices, you can find both new and secondhand tools and materials there. Shopping online means more time for doing what you enjoy or what brings in your income. The world is becoming smaller and shipping costs and delivery times are too.
Often the websites that sell crafts materials also have a range of useful resources such as guides to using their products. They also have convenient contact information, like email, and as they are often craftspeople themselves can give advice on craft specific problems.
Publicity and exhibition requests
Many of the sources that are traditionally used for publicity such as magazines, newspapers and event organizers are now using the internet as a way to find craftspeople. Not only is the internet often a faster way to find what they need but it is also a visual medium. Therefore having a website for your craft business is not just about gaining sales and commissions but it also provides a way for the media and galleries to see your work.
One example of this is an artist interviewed on Aussie Crafts who has in the last few months been contacted by a lifestyle magazine to do an article on her work, as well as another contact to request her involvement in an exhibition. Both of these publicity avenues have stemmed from her website, which contain galleries of her work.
This same artist is also a member of an organisation supporting her medium, which has a website that lists galleries showing members’ works at any given time. There are organisations such as this for many crafts, both global and local, that are worth having a membership with.
Sales and commissions:
The most obvious way that craftspeople are using the internet is to sell their products to a wider market than previously possible, what is not so obvious is that there are many ways to do this. One artist interviewed extolled the virtues of the internet as, "It's been huge for us. We sell artwork and DIY kits all over the world and so put virtually all our marketing energy into our website. We get well over five thousand visitors every month at basically no cost and the whole world has become our target market."
Some of the reasons people decided to sell their crafts online include not having to deal with galleries, no commissions to pay, less overheads than a store and the fact that there is more time crafting and less selling.
Apart from setting up an often expensive e-commerce website there are other means to gaining online sales:
A 'brochure' style site, which displays the products you make but does not sell them online. Instead it can be used to promote a market stall, shop front, commission enquiries etc.
Many craftspeople are selling their work in auctions at Ebay; this can be a lucrative option for the right products.
Online craft malls are a way to have an online presence without the hassle and overheads of building an e-commerce site. Search for craft malls in the search engines and you will find such sites as craftmall.com, aokcorral.com and lilysplace.com. These sites generally use Paypal as a payment option to take the headaches out of online payments and are similar to Ebay without being auction based.
Human contact:
One of the common problems that people who craft for an income mention is loneliness. Oftentimes they work at home alone and this can be very isolating. The internet can provide avenues to have contact with others who craft. They could be in the same locality as you and allow for face-to-face meeting or they may be on the other side of the world.
There are many group and organisations for most craft genres, such as Yahoo groups or MSN chats. Often if it is a location-based group there are classes and retreats organised for people to come together and learn. These groups can become invaluable for technical advice, feedback and learning but also that human contact that is a necessary part of life.
Client contactEmail is a fantastic way to keep in touch with clients and industry contacts. It is so much cheaper than a phone call (i.e. free) and is much less time consuming. Email provides a simple means to show clients’ examples or progress on a work via photograph attachments. It also provides a record of all communication.
Online messaging systems, available for free from MSN and Yahoo, are also useful ways to keep in contact with customers. These can even be used to give online support by providing your identification name on your website. However these systems can become a time waster instead of saver if you are not careful.

Narelle Davison comes from a craft background but changed careers to marketing and web development. She has created the Australian arts and craft site, Aussie Crafts, to provide information and promotion for craftspeople through interviews, articles, forum and directory. The interviews provide great reading to both admirers of each craft and fellow crafters. If you are an Australian craftsperson and would like to be interviewed please visit http://www.aussiecrafts.com/interviews.html . This article can be republished if the byline links are kept intact.
Article Source: http://EzineArticles.com/?expert=Narelle_Davison

Read more!

Wednesday, March 08, 2006

Intarsia Wood Flower

Router Bit Basics

by: Kaitlin Carruth


A router bit is a tool for woodworking giving a quality finish to woodwork. It cuts wood providing a way to give a clean and even a decorative edge to woodwork. The following is some basic information about router bits to get you started in your woodworking efforts.
The Parts of a Router Bit
Here are the there main parts of a router bit:1) The shank- the part of the router bit that is inserted into the collet (the sleeve of the router).2) The cutting edge- this part cuts and removes the wood. They are available in several sizes and shapes. 3) The pilot- the guide for the router in order to make a correct cut. It can be an extension of the shank or a ball bearing attachment.


The Different Kinds of Router Bits
While there are over 50 router bit profiles, here are the four basic types of router bits:1) Grooving Bits- These bits make a groove in the piece of wood. This type of bit is commonly used for street address signs for homes. Different types of grooving bits include the V-Groove, the Round-Nose and the Straight Bits.2) Joinery Bits- Router bits that help make several different types of joints. This type of router bit includes the Finger Joint, the Drawer Lock, the Rile and Stile, and Dovetail Bits.3) Edge Bits- Bits used to create different-shaped edges in woodwork. Examples of these types of bits include the Beading, Flush, and Round-over bits.4) Specialized Bits- These bits do not fit into one of the above categories and have more specialized purposes including the Key Hole, Raised Panel, and T-Slot bits.
Carbide versus HSS bits
Most of the bits you will find available in hardware stores are carbide (short for tungsten carbide) tipped. These router bits are made of a very hard material that stays sharp longer than steel and is resistant to heat. However, this type of router bit can chip and is very expensive (this is why most of the bits are tipped and not made completely of carbide).
High Speed Steel (HSS) bits have been around longer but are not as readily available as the carbide bits. An HSS router bit is not as expensive but will dull fairly quickly. The HSS router bit is more suited for occasional work while a carbide router bit is meant for greater use, lasting 20 times longer than the HSS router bit.
How to Take Care of Router Bits
To keep your router bit set in good shape, you will want to do small amounts of cutting at a time. This not only keeps you away from overheating, but will also extend the life of the router bit. Always use the shortest and widest bit possible for your project. This will again prevent overheating and will also avoid chattering.
Always keep your router bits clean and free from pitch and in good condition to avoid dulling. Remove any pitch and tar from the router bit (if not removed, it will cause the bit to unevenly bounce on the surface). Commercial bit cleaner can be used to remove pitch and tar however, a scrap piece of wood will usually do the trick. This will help keep your router bits in good working order.
The parts of a router bit, the types of bits, the difference between HSS bits and carbide bits, and the proper care of router bits are all important concepts to understand when selecting your own router bit set. This basic knowledge will help you know what you need in a router bit set and how to use it properly.
Kaitlin Carruth is a client account specialist with 10x Marketing - More Visitors. More Buyers. More Revenue. For more information about router bits, please visit Tool America

Read more!

Tuesday, March 07, 2006

Intarsia Wood Wall

This is one of a series of wood walls that I build for some new homes in Texas. Once you have the design layout wood walls are very easy to make and install.
By The Sea- Intarsia wood wall design
The use of intarsia to cover walls changes the room dramatically, adding atmosphere and character to a room.

Read more!

Woodworking Beginners: Can You Really Start Without Knowing These Secrets?


By Ferhat Gul

Woodworking: Where To Start - Tips From Experienced Woodworkers...
Woodworking encompasses a broad area of skills, specialties, and applications. Some beginners take on too much too soon or blow their savings on expensive woodworking tools and machines that they don't know how to use and might not ever need. And even some basic techniques can be confusing or easy to do incorrectly. Experienced woodworkers have some simple, but insightful tips to help you get off to a good start.
Do Your Research...
Initiative, courage, a sense of adventure, these are all good things, and many fine woodworkers learned their skills by just jumping in and trying to build something. Chances are whatever they chose for their first project, it came out better than they thought, but not really nice enough to use or display. Even those brave souls that start from scratch with no preparation often end up seeking out some books, magazines, or experienced woodworkers to figure out how to do it right. The woodworkers we talked to stressed that a person can save themselves some time and frustration by learning about the different aspects of woodworking before starting a first project. Many suggested finding some good books or magazines, either at the library for free or at the bookstore. Start with the basics and learn about different forms of woodworking, types of trees and woods and how they are used, various tools, etc. - just the kind of information presented here in this article. "I have an entire corner of my garage filled with books and magazines," shared Paul Johnson, who has been woodworking since he was a young boy. "I subscribe to a couple and keep those that have projects or techniques that I would like to try. I also buy a couple new books every year. When I first started woodworking, I bought them left and right; whenever I came across one that was recommended or had information I wanted to learn. They help give me ideas for projects," he added. "I especially like those that come with patterns." After learning about the basics, you should have an idea of what type of woodworking interests you, and you can move on to books or even classes that teach hands on skills in that particular area.
Take Some Classes...
In fact taking classes was recommended by several of our experts. Whether it's a beginning class through the local college or something taught by an experienced woodworker, it will typically give you a good overview of different tools and woodworking safety. Some building centers and lumberyards also offer classes on basics or teach you how to make a specific project. If you aren't big on classes, but you know a person who is skilled in woodworking, ask if they would let you assist them with a project, or perhaps just sit and observe. Most woodworkers are pleased to talk about their art and share it with others. Chances are they will be happy to oblige.
Keep It Simple...
The answer, "Keep it simple," came up over and over, when asked for advice for new woodworkers. Start with simple projects, preferably those that use only hand tools. This way, you will learn how to do the important things like measure, cut, shape and join. Getting good at those basic skills is extremely important. If you are brand new to woodworking and haven't used tools much before, you might want to consider starting with a precut kit. Most kits consist of wood that is already cut in the appropriate shapes and sizes. It is up to you to follow the directions and put the pieces together. These kits typically require nailing, screwing, gluing, sanding, and finishing. You can make birdhouses and feeders, benches, plant holders, and many other fun items to get you started. Even as you advance to more complex projects, don't worry about planning and sizing your own lumber until you feel comfortable and confident. You can buy lumber already prepped and cut in many different widths. And table legs, chair spindles, and other turned pieces are also readily available pre-made. Ease into some of those more difficult projects over time, adding greater levels of difficulty to each project.
Tool Tips...
The suggestions to keep it simple applied to woodworking tools as well. Most people interviewed recommended buying tools as you need them and adding to your selection as required for new projects. If a project is purchased as a kit, or with printed instructions, the list of tools needed is included. Depending on what type of projects you choose to start with, you will typically need hammers, tape measure, clamps, a square, saws, hand drills, and a set of chisels. These will probably cost you around $200-$300 dollars.Some woodworkers said that investing in a good table saw early on was important, but only if you will be doing projects with many cuts, especially those with different types of angles. For most beginner projects, a handsaw, or perhaps a circular saw will suffice. It is strongly suggested that you begin by buying good tools, but not top grade until you decide for certain that you want to stick with woodworking. If it becomes clear that this will be an ongoing interest, then consider buying the best quality tools you can afford. Best quality doesn't always mean the most expensive, and you will have to do your research. Kevin Warner, who has been teaching high school shop for over twenty years, had this to say about woodworking tools. "At school, I have a limited budget for tools, but I would rather buy a few high quality tools and have the kids share them than spend my money on cheap equipment. There's nothing that will turn a young beginner away from woodworking quicker than a crappy tool that doesn't do what it should. "The same is true for home woodworking. Our experts recommended spending as much as you could afford on the basic tools like hammers, saws, screwdrivers, drills and bits. "These are tools you will need around the house even if you don't pursue woodworking," Sarah Greeley pointed out. "If you spend the money up front, and care for them correctly, these tools will last you a lifetime because you bought quality to begin with. "If you have a tight budget, consider purchasing tools at an estate sale, auction or garage sale. Some may have worn handles or look like they are rusty or dirty, but if they are quality tools and generally sound, you can clean and repair them for less than it would cost to purchase new. In general, you get what you pay for with woodworking tools, but sometimes you pay for the name, or for features that you may not use in your particular type of woodworking. So again, you will need to refer to books, magazines, Web sites, and other woodworkers to learn more about different types and brands of tools. And so you see, the tips have brought you full circle, back to the research and learning, which is what so many woodworkers stressed the most. There is much to learn and, as has been said, it is an ongoing process. But thanks to the wealth of information out there about different aspects of woodworking, and the many Web sites and Internet resources, it is easy to research your questions. You just have to take the time.
About the Author
Copyright © 2005 by Ferhat Gul. All rights reserved. Ferhat Gul is the publisher of the brand-new "Woodworking Beginner's Guide - Tips From Experienced Woodworkers to Help You Get Started". This comprehensive, yet compact woodworking introduction for beginners is easy to read and helps to save time, money and effort.

Read more!

Pine Cabinet

A pine cabinet with a straight forward simple design always looks great.The cabinet has a flat panel intarsia design and carved pulls.
Pine cabinet with intarsia inlay and carved handles.
The inside has a clothes hanging rod, one upper shelf and one lower shelf. The outside of the cabinet has a natural lacqured finish with a white glaze.

Read more!

Everything You Need To Know About Cabinets

by Barry Goodknight


Basic Introduction to Cabinets When you think about cabinets, more often than not, you think of kitchen cabinets. These are the hottest cabinet items in the market today because of their functionality, importance, and versatility. However, there is more to cabinets than kitchen cabinets, as cabinetry encompasses all facets of home decoration. Cabinets are more than just storage. They speak of your personality, your taste, and your sense of style. The possibilities are endless, but it boils down to what your choice is.
In terms of style, there are just too many different kinds of cabinets to chose from. But they are basically subsumed into common classifications such as framed or frameless, stock or custom made, traditional, country, or modern style, made of hardwood, wood veneers or other materials. Stock and Custom Cabinets Cabinets are generally classified into stock cabinets and custom cabinets. Stock cabinets are those cabinets that are pre-fabricated and can be bought “off the rack” in many cabinet shops. Custom cabinets, on the other hand ordinarily refer to cabinets that are specially built by cabinet makers to fit a homeowner’s very detailed specifications, and are usually done on site (homeowner’s house). Framed and Frameless Cabinets A framed cabinet is a cabinet with a frame attached to the front edges of its body. This is also known as traditional, face-framed or American-style cabinet. A frameless cabinet, as the name implies, is one that has no frame attached to the surrounding face of the body. This is the standard among European-style cabinets. Traditional, Country, Or Contemporary Style If one goes by tradition, all kitchen cabinets are made from hardwood and are fastened to the kitchen walls. But nowadays, permanently fixed cabinets have given way to standalone mobile cabinets that may come in unconventional materials such as glass or plastics. Traditional style cabinets are appealing to more people because of its’ ageless look. Country style cabinets give a comfortable, cozy and welcoming feel to a room. Hardwood is the best material to start with if you want a country feel to your cabinets, as this can blend well with florals or nature-inspired textiles or designs. There are countless other styles to choose from, enough to get you more confused on choices to be made. To avoid this, It would be best to know where to look in the first place. Browse through magazines, woodworking books, or cabinet shops. You can expand your search to websites on home and furnishings. But do not forget to choose a style that would naturally blend with design and architecture of your house. Solid Wood, Bonded Wood, and Wood Veneers It’s been a long time since having new cabinets means getting the services of a cabinet maker or getting down to your work clothes to make customary wood cabinets. As technology and skills improve through time, the possibilities have become endless. Old and new materials offer other different classifications of cabinets. Solid Wood Because of its versatility and ageless look and appeal, wood has become the most common material used for cabinets. It gives out a warm, homely atmosphere, and blends well with almost any kind of interior design and décor. The different kinds of wood species furthermore give more varied options, but your choice would eventually depend on your personal style and budget. Wood is the most sought after material for custom cabinets. Wood materials come from either two types of trees: hardwoods and softwoods. Hardwood wood materials come from coniferous trees, or trees that are easy to saw. Softwood wood materials come from dicotyledonous or hard-to-cut trees. Different wood species fetch different prices, depending on its availability and overall appearance. There are so many materials to choose from: maple, oak, cherry, hickory, yellow birch, or pine. Oak was the heavy favorite among cabinet builders until recently, when maple became more popular in the cabinet industry. It is very adaptable to any kind of cabinet style due to its light and regular grain texture. Very similar to maple in terms of versatility, is the yellow birch variety. With its strength and wide range of colors, it is a favorite choice for kitchen cabinets. Cherry wood colors range from pinkish to red-brown when aged and exposed to sunlight. Hickory is a light colored to reddish brown hardwood that is best for a staining finish. While pinewood is the most inexpensive variety, it needs special handling and preparations due to its east exposure to bums and scratches. Exotic wood fetch higher prices as these are the more rare varieties. Among those belonging to this category are mahogany, ebony, and walnut. Mahogany is mostly come from tropical rainforests. Its’ reddish brown color and regular grain qualities make it a perfect alternative to old oak wood. Walnut colors range from dark brown to a purplish shade of black. Ebony wood generally refers to very dark or black wood. Bonded Wood Bonding refers to the process of making large wood materials from several smaller pieces of wood. Bonding processes vary. One way is cutting wide boards into narrow parts, then glued together to create the desired width or shape. Blocks of wood may also be glued together to make up a single part of a cabinet. Another process involves wood chips or small wood particles mixed with a gluing substance, the processed to make durable wood particleboards. And lastly, the process of bonding several layers of particleboards may be done to come up with plywood panels that are ideal for adding strength to softwood cabinets. Wood Veneers Wood veneers are thin layers of wood materials from superior species of wood. These are glued to the main cabinet material, usually plywood or plasticboard. This is the best option for a more versatile wood cabinet accented by different wood patterns and textures. Wood veneers are aesthetically effective not only for raised panel cabinet doors, but also for flat or recessed cabinet doors. A word of caution for the budget conscious: While wood veneer as an alternative to wood seems to imply that is an inexpensive material, very elaborate veneering designs would result in more expensive work pieces.

Read more!

Monday, March 06, 2006

Pelican

Sunday, March 05, 2006

Get the Most from Woodworking Tools

Intarsia doors installed on a rebuilt cabinet.
Get the Most from Woodworking Tools with Some Useful Tricks of the Trade
Written by John Mann

Friday, 03 March 2006

Many of the great woodworkers have become skillful because they have had the opportunity to watch and learn from a pro. Undoubtedly, serving as an apprentice under a professional woodworking expert is the best way to hone your own skills but not everyone has this opportunity. However, if you have the drive and passion for woodworking, it is entirely possible to become highly skilled by simply reading about the subject. The following includes some useful tricks of the trade that will surely help you to get the most out of your woodworking tools. A woodworking expert is not born; it takes time and some useful hints.


Wood is the woodworker's most important tool. Without wood, your woodworking tools would have no job and there could be no end product. The first trick to woodworking is knowing how to properly cut plywood, and that involves using the right tools and manipulating the wood in the appropriate way. Different cutting jobs require different blades. Blades differ depending on the number of teeth, the width, angle and the rake of the blade. Before cutting, assess which blade best suits your cutting needs and which one will help you to produce the cleanest cut possible. When you are ready to cut, score the cut first by running the plywood through your saw once, removing only a small piece. The next cut that you make will be much cleaner. To keep a clean line in your cut, use a router. Make sure that your router is fitted with a straight bit as this will help you to achieve a clean line. A pilot bit and a straight edge will also help produce a clean line. You may also want to consider purchasing a panel scoring setup. Some saws can be fitted with a plywood panel scoring setup that is most useful if you cut a lot of plywood. This setup consists of a smaller blade that first scores the surface of the plywood before the wood reaches the cutter.

Once you have your wood cut, it is necessary to sand down the rough edges. You may not realize it, but sandpaper is one of your important woodworking tools. Here are some helpful wood sanding hints. For easy handling, some woodworkers cut their sandpaper into smaller pieces if they have a sanding block or a finishing sander while others fold the sandpaper to rotating sides as it wears down. However, make sure that your sandpaper is not folded so that two abrasive sides touch as this will wear down the paper against itself during use. To prevent this, fold the paper so that the abrasive sides contact only the non-abrasive sides. This simply requires a single cut along half of the sheet.

Once all your wood is cut and well sanded, you are ready to build. Handling wood is not always easy though, but there are tricks that can help you to do the job right. Anyone who has ever tried to nail into the end of board knows that splitting can happen because as the nail is driven into the wood, the wood fibers are forced apart causing the grain to split. Experienced carpenters will flatten the tip of the nail with a hammer before driving it into the wood because a flattened tip will slice through the wood and crush the fibers rather than split them. This woodworking trick is most useful when installing molding and trim.

There are so many tricks of the trade to be learned when it comes to woodworking. You will find that as you begin to amass a larger knowledge of woodworking tips, your projects will start to look better, and you will be well on your way to becoming a woodworking expert. Woodworking professionals will tell you that there exists an important relationship between the tools you use and the wood you handle.

Article Source: http://www.ArticleBlast.com
About The Author:

John Mann is an experienced home renovator and webmaster. Visit his website Workbench Ideas for workshop tips.

Read more!

Monday, February 27, 2006

Selling Your Woodworking Products

Our challenge as Crafters and intarsia artists is to discover our markets. You need to know your market, who is your customer?Are you selling a product to local or global customers.If you're selling to local customers, say out of a storefront, you must know if you are in the right market and selling at the right price for this local customer. If you're not showing the right product to the right customer base, chances are they're won't be any sales are at least very few.


Read more!

Sunday, January 22, 2006

Intarsia Fireplace Mantel

Intarsia design inset on fireplace mantel.
This is a display mantel and fireplace surround for the lobby of Phoenix Woodworking Corporation which does custom woodworking for the northern Illinois area. The mantel was painstakingly constructed by artisan cabinetmaker Stan Michals.
Built of cherry wood with birdseye maple accents, this fireplace mantel is a project that takes some time to build due to the many details involved. The sides are mitered columns with fluted overlays, all staying within the design theme of the room. Read more....

Read more!

Friday, December 30, 2005

"Intarsia Hawk"

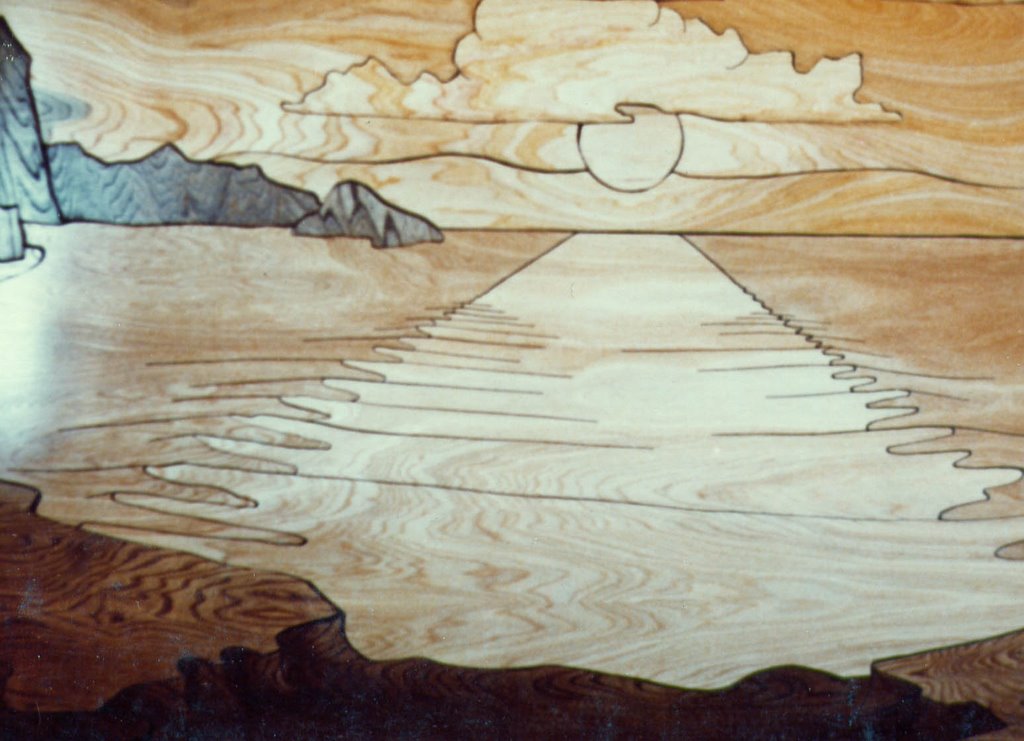
This intarsia design was inlaid into a painted background of rolling hills ( what you see here is a cropped and black painted version). The theme is a hawk ( the larger bird ) flying over the midwest hills dreaming of being an eagle soaring high through the mountains.
This is the cover page for my E-Book "Intarsia Designing"

"Hawk's Dream" Posted by Picasa

Read more!

"Intarsia Woodworking"

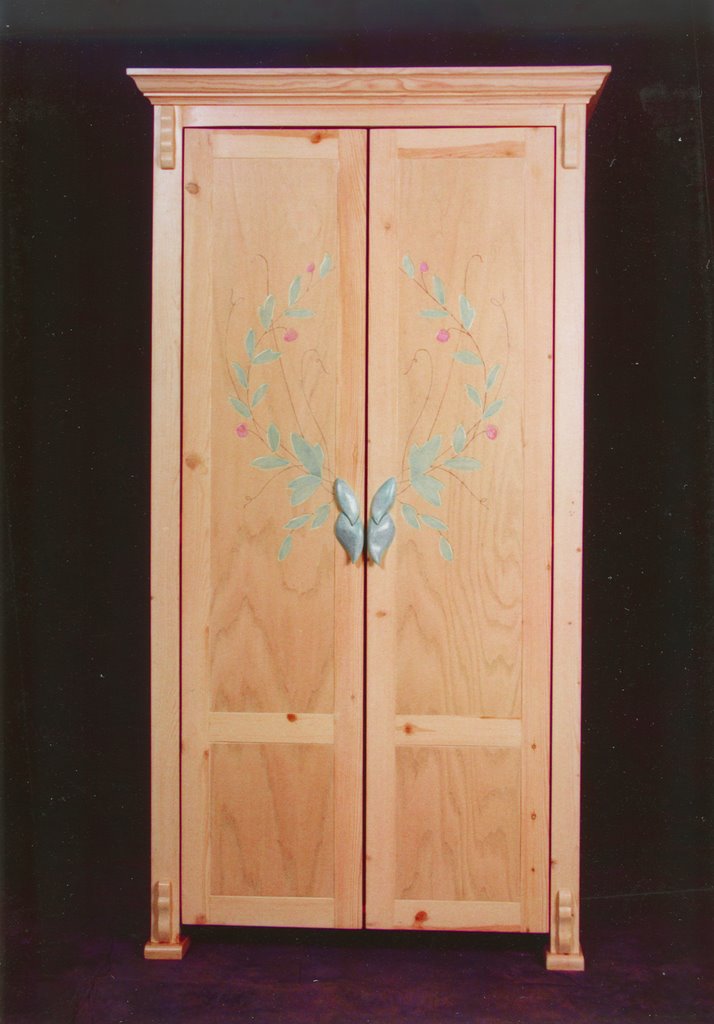
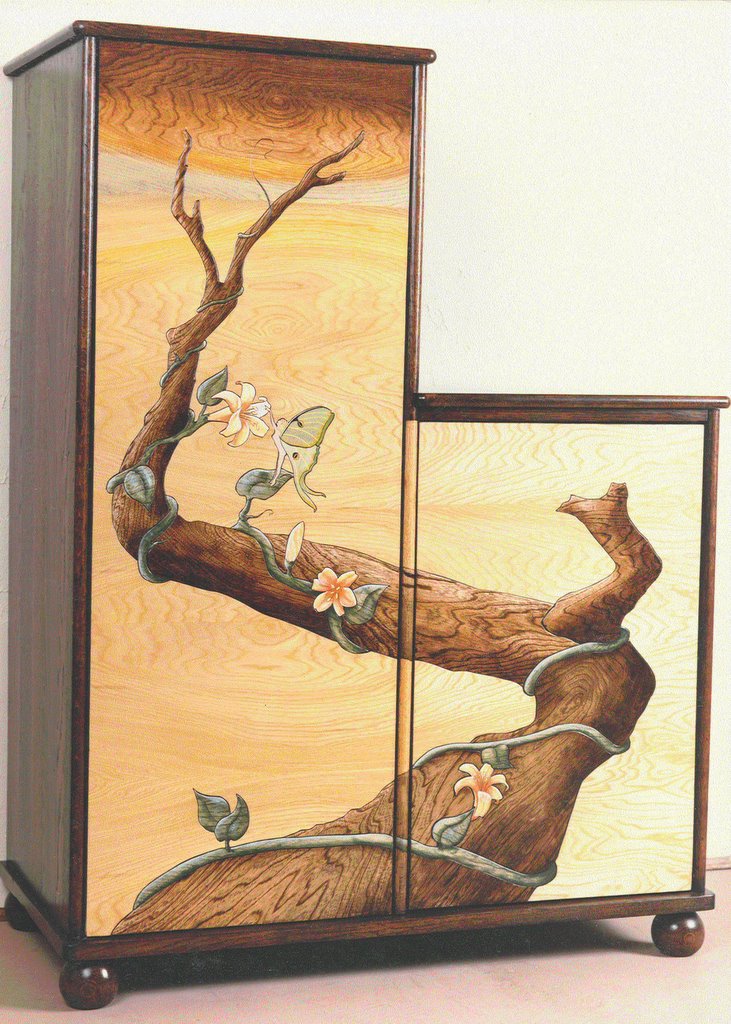
"Intarsia doors" is what I had on my mind when I saw this cabinet laying in pieces in an old barn. First I took off the old finish, then cut out some of the cabinet that I didn't want so I would have room for new stereo components. Repaired and glued up the cabinet box. Next I sketched a intarsia design for the doors and enlarged it to size. I cut the pieces for the design, stained, glued up and finished the doors off the cabinet. I finished the cabinet with the doors off. The intarsia doors are split down the center, unlike some of my doors where the opening depends on the picture lines. This was an old "RCA" record player cabinet thats now "Reborn".

Two-door Stereo Cabinet Posted by Picasa

Read more!

Sunday, December 25, 2005

Wood and Art


Woodworking and art has been the main interest of my life. I’ve made my living at this for the past 30 years as a cabinetmaker and furniture builder.
Sometimes I’ve been in business for myself and sometimes worked for others.
Cabinetmaker’s love building the fancy stuff, but for most of us cabinetmaker’s this isn’t what you build on a daily bases.
I tell people I have an affliction called “art” and it seems to drive me towards wanting to do something different, something artful with each woodworking project I’m involved with.
I love to design, to add the little finishing touches that makes the piece stand out as unique.
Having owned woodworking businesses I am interested in the business end of woodworking and it’s challenges.
So these topics and some others like computers and business on the web are the main subjects of this blog.
I invite you to join in and give your input

Read more!